RSS Feed

Category Archives: D.I.Y

Wedding Name Cards

So one of my BFF’s SIL is getting married at the end of this month. In Hawaii. Can you say jealous??

It’s finally the time when all the little details are starting to get checked off the list. She asked me for the template for my own wedding name cards, which you can find here, but thought it would be fun to see what other awesome ideas are out there.

This is a way you can get super creative and really utilize your theme throughout – Here are a few of my favorites!

Courtesy: GreenWeddingShoes.com

Courtesy: IntimateWeddings.com

Love these vintage name cards from rummage sale vintage childrens books!

Courtesy: ArdentPhotography.com

Having a vineyard, rustic, vintage wedding? Or just love wine? How adorable are these??

Courtesy: Martha Stewart Weddings

Classic. Beautiful. Simple. Elegant. Love.

Courtesy: Weddingdish.thinklikeabride.com

Love the crystal drop. Adds sparkle to beautiful, simple vintage.

Wedding Planning Stress

Posted on

Planning a wedding can be extremely stressful, especially for all you DIY-brides. Not to mention the stressors of your full-time job, and trying to live a “normal” life in the midst of wedding to-do’s. Planning a wedding is like working a second job. You have to find the time to tend to a multitude of details as part of an already busy schedule while managing vendors, family anxieties and demands, your groom, your emotions and an array of tricky wedding dynamics.Here are some tips & tricks to try to ward off the wedding woes:

Prioritize: There are so many options anymore in terms of what your wedding can be. Traditional and in a church? In a backyard? A tropical destination wedding? The options are limitless, and couples are less bound by tradition now than ever before. If you have different ideas of what you want, before you plan any wedding details, sit down with your fiancé and make a list of the top three things that are important to each of you as far as the ceremony and reception are concerned. Then, calmly and patiently compare lists to see where you can compromise. !

Family & Friend’s Opinions: Almost every bride and groom deals with at least one or two family members or friends that has strong opinions on what your wedding should be while you’re trying to plan it. Remember that this is your wedding—not everyone else’s. It may be hard to tell your loved ones “no” or disagree about your bridesmaids wearing tangerine, but if you want your wedding day to be truly special and unique you must stand your ground on what’s best for you & your love. Politely, yet firmly state your decisions with the support of your partner.

Looking Good on your wedding day: Every bride wants to look their absolute best on the day that everyone is looking at them. But you need to make sure that you aren’t being unrealistic about your body image on the big day. Make sure that your wedding weight-loss goals are totally realistic. After all, planning takes a lot of time and can be stressful, so you may not have as much time as you think you do to exercise and cook healthy foods. Also, be sure to drink enough water, eat lots of fruits and vegetables, and get that beauty rest. These three things will really give you that wedding-day glow.

Budget: More money, more problems, right? Well, in the case of wedding budgets, less money and big expectations can equal more problems, too. On average, U.S. couples spends about $20,000 on a wedding. And that number doesn’t include a honeymoon or engagement ring. Unless you have a large budget already in place, or family members with deep pockets, keeping costs down can be challenging at best. Remember to prioritize any and all expenses, and balance costs as you go if necessary. If you go over on catering, don’t spring for those chair covers or pricey linens. If your bouquets cost more than you expected, trade out half of your centerpieces for less costly decorations. Ask yourself what you’ll remember when you look back on this day. Will it be your beautiful dress or suit? Will it be the music and DJ? How about those expensive invitations? Determine your needs vs. your wants and be realistic about them. You know what’s more stressful thanplanning a wedding? Coming back to a heap of debt after your honeymoon.

The Guest List: From being afraid of offending others to your in-laws insisting that your fiancé’s fourth and fifth cousins just have to be there, compiling a guest list can get tricky. Sit down with your partner and agree on a guest policy together. Decide if children are or aren’t welcome and the maximum number of guests you want (and can afford). Consider dividing guest counts evenly between your two families and have the first and final say on who attends. No matter how you do it, agree on a policy and don’t waiver from it. Sticking to rules helps you and your family members explain to others why your third-removed cousin wasn’t invited.

You Want the “Perfect” Wedding—No Exceptions: Of course you want your wedding day to be perfect. Who doesn’t? But how realistic are your expectations, and what will happen if everything doesn’t go perfectly? Remember to consider the things that you and your guests will remember. Are they really going to remember that you did or did not have small crystals on the table? Do they care if they have paper vs linen napkins? Will you consider the day to be ruined, after all of that planning and thought? Vow to be easy going on your wedding day and take it all in stride. There is no such thing as a perfect wedding. You know the saying, “Don’t sweat the small stuff”? Well, during the wedding planning process and the day itself, remember the big picture and take a deep breath. After all, no one will remember the lopsided cake or miss the parting gift that the reception staff forgot to put out. No one will know if you fudged your vows or forgot your earrings. They’ll be too busy remembering what a great time they had sharing the start of your marriage with you!

Other Good Ideas to Relieve some of that Stress

  1. Date Night: Plan a date night with your fiancé — no wedding talk allowed. Make it romantic, and remind yourselves that all this wedding craziness is going on because you’re madly in love.
  2. Laugh it up. Laughter creates feel-good hormones, so either rent the funniest flicks of all time, or join your friends and fiancé for a night at the comedy club.
  3. Be a Kid Again. Go out and fly a kite. Blow some Bubbles. Jump on a swingset with your love or a friend. Remember how freeing and fun it was to be a kid again.
  4. Spend time with your pet. Health magazines and sites often report that just petting a dog can create relaxation hormones, so take some time to cuddle with your pet, or go to a friend’s place to “borrow” her dog for an hour or two.
  5. Exercise. When you’re busy, your fitness routine could suffer. But don’t skip those yoga classes or evening walks just because you have a lot on your To-Do list. Making time to work out keeps you on an even keel, relaxes the mind, and gives you more energy to handle that To-Do list well.
  6. Mother Nature. Try going for a walk at the beach or in the woods, by a lake, or in the park. Breathe in that fresh, clean air and notice the upturn of the bright green leaves on the trees. Listen to the waves crashing and think about something bigger than yourself and your wedding. It’s a terrific way to escape.
  7. Read a great book. Find something funny or intriguing. Nothing wedding-oriented, nothing self-help, nothing stressful in any way. Then either curl up in bed, by the fireplace, or in a hammock to “check out” for a few hours.
  8. Community. Attend a cultural event, like a street festival, a concert, a play, a dance performance, a jazz club night. Some events are free, so check the newspaper for a list of events going on in your area. http://www.festivals.com is another great resource for unique goings-on that can take you away from it all.
  9. Keep a gratitude journal. The best way to escape what’s going wrong with your wedding plans is to make yourself think about, appreciate and write down what’s going right. And then look back to it often when you need a little boost.

Things Worth Remembering:

  • Remember that no wedding is perfect.
  • Remember that you can’t please everybody.
  • Be willing to compromise.
  • Delegate responsibility whenever possible.
  • Remain calm and rational when faced with stress.
  • Communicate effectively (without anger).
  • People are unpredictable
  • You are not to blame for problems that your guests have.
  • Be honest with yourself and your guests.
  • You don’t need to be a mediator between guests.
  • There are some things that you cannot control.
  • A wedding takes a long time to plan.
  • A variety of emotions are normal during the planning process.
  • Take time out for yourself.
  • Take time out for your relationship.

In any stressful wedding-planning event, remember to always take time to eat healthy foods, exercise, sleep well and practice stress busters like yoga or meditation. Making time for just a few minutes of stress reduction each day can go a long way now—and during your marriage, too!

Wedding Budget Checklist

Posted on

Congratulations!!!!!! You’re ENGAGED and GETTING MARRIED!!! What a crazy ride you’re about to embark on! With all the thoughts flying through your head, you’re realize how much there really is that you have to do!

Your first wedding planning to-do? Setting your (realistic) wedding budget. This will also help you with your overall planning checklist. From the dress to the reception, here’s how to plan your wedding budget and stick to it.

Figuring out your wedding budget can be stressful, but don’t worry — we’re here to help! You have options. Whether you’re dreams are of a lavish hotel affair or an intimate outdoor gathering, this will hopefully help you figure out what you have to spend to make it happen.
 
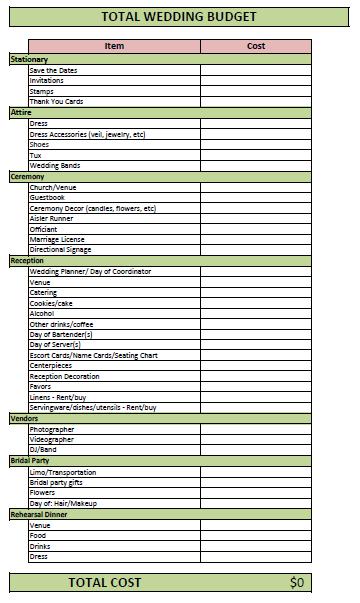
1. Get organized. Create a budget spreadsheet with a set dollar limit for each part of your budget (attire, reception, flowers, etc.). See the budget checklist I used for my own wedding – feel free to use it for yours too! It’s fully changeable!
https://docs.google.com/spreadsheet/ccc?key=0AmWJdlXCteWsdGpyRmVCb0p2R094alFLS2tHNW9aaFE 

Scroll down to the bottom to see and save the picture of the spreadsheet.

2. Figure out Who’s Paying & How Much. Depending on your family situation, this conversation can be a little awkward unless you’ve always known who’s footing the bill. Traditionally the bride’s family is the one to pay for the extravaganza, but anymore, the groom’s parents pitch in some too. This is completely up to you on how to go about it, but this is an important piece of the puzzle to truly know how much you’re working with. Some families choose to have each set of parents give a lump sum or finance a particular aspect of the wedding (such as the ceremony, honeymoon, or catering) instead of just committing to a dollar amount. From there, decide how much you two can contribute between now and the wedding. (37 % of the couples we polled say they’re planning to contribute financially to their wedding.)

3. NEED vs. WANT. Figuring out what you actually NEED for your special day is crucial. It’s all the little details that add up really fast. Think of it as buying a new car – you should figure out how much you need to spend to get what you want and set your expectations accordingly.  The average cost for a 150-person wedding is about $25,000 (higher in urban areas). Here is a basic breakdown of what you can expect to pay:

  • Reception: 48%-50%
  • Ceremony: 2%-3%
  • Attire: 8%-10%
  • Flowers: 8%-10%
  • Entertainment/Music: 8%-10%
  • Photography/Videography: 10%-12%
  • Stationery: 2%-3%
  • Wedding Rings: 2%-3%
  • Parking/Transportation: 2%-3%
  • Gifts: 2%-3%
  • Miscellaneous: 8%
  • To avoid stress, allot about 5% of your budget for a “just-in-case” fund.
  • If you’re paying for your honeymoon yourselves, remember to budget for that as well.
4. Saving. As soon as you know you’re going to tie the knot with your honey, start putting aside as much of your income as you can for the wedding. Saving 20% of your monthly income is a good (yet painful) goal. The longer your engagement, the more you’ll be able to sock away. How can you Save? Limit your spending on small stuff – Here are some ideas:
  • Rent a movie instead of going out.
  • Buy/make your own cup of joe instead of going to Starbucks.
  • Make dinner with your love instead of going out to eat.
  • Head to the thrift store to get some goods instead of large department stores.

These changes will hardly affect your quality of life, but after a year, the extra cash will add up and can cover some wedding essentials.

All in all, there are several ways to cut, or go all out in your spending on your wedding. The bottom line: This is YOUR day. And hopefully your only wedding. Make it what you want it to be and DON’T do things just because you care what everyone else thinks! Hope this helps! Happy Planning!! 

Wedding Budget Checklist

Pinterest Addiction

Addiction. Obsession. You just want to take one more look. Pin one more item. The newest time-stealer has arrived. And we are totally hooked. Yes, that’s right – PINTEREST. It is the most fantastic website that exists. It consumes all time, yet has the most incredible ideas. Ever. Follow us at: http://www.pinterest.com/simplymoxie Here are some […]

DIY Seating Chart Ideas

Along with the DIY Escort Card ideas post, I thought it would only be appropriate to throw out some seating chart ideas as well. Check them out, mold them to your theme, and send us pics on what you decide to do!

1. Rustic Seating Chart
Loving this adorable and totally rustic seating chart. This would be perfect for an outdoor wedding or a rustic, earthy themed wedding.

Photo Credit: LadieJ37

2. Window Pane Seating Chart
Again, completely easy to make and super cheap, especially if you can find an old window pane!

Photo Credit: WeddingBee

3. Chalkboard Seating Chart
Love this and it would be so so easy! You could buy a piece of plywood, they now sell chalkboard paint and make your own from scratch!

Photo Credit: Wedding Bee

4. French Inspired Board with frames
This would be totally easy and totally fun to make!

Photo Credit: The LANE


DIY Escort Cards & Board Ideas

When your guests first walk into your reception, the first thing they’re going to look for are where their table is. If you are not doing pre-arranged tables, we suggest making some type of sign telling your guests they can seat themselves wherever they’d like.

Here are some fantastic ideas we found to direct your guests to their seat for the fun!

1. DIY Chicken Wire Seating Chart

Photo Credit: Scissors and Spatulas blog

Scissors & Spatula’s blog has created this SimplyAdorable DIY Chicken Wire Memo Boards. Pair this with some DIY painted or fabric clothespins and you’ve got yourself an adorable place to hang your escort cards!

2. Rustic DIY Escort Card Holder

Photo Credit: Wedding Bee

Loving the rustic, vintage look of this awesome escort card holder. The cards on the tower are fantastic too!

3. DIY Wine Cork Escort Card Holders

Photo Credit: Lollipops & Paper

This is quickly becoming THE thing to do for weddings! And they’re adorable, yet somewhat difficult to make. Check out the instructions and try your own!

4. Escort Stones

Photo Credit: Wedding Bee

Instead of paper, just pick up some river stones and either write or paint names & table numbers on them! So easy & free as long as you live near some water!

5. DIY Flower & Moss Escort Cards

Photo Credit: Elizabeth Ann Designs

Loving the look that Elizabeth Ann Designs put together to make this!

6. DIY Starfish Escort/Place Cards

Photo Credit: Newport Nuptials

These would be a perfect fit for a nautical or beach-themed wedding. **Just a note, they do sell plastic ones which we would highly recommend. Starfish otherwise were living animals at one point, but there are plenty of places to find the plastic kind!**

7. DIY Butterfly Place Cards

Photo Credit: Princess Panda

Princess Panda takes you step by step in how to make these adorable little escort cards/place cards.

8. DIY Lemonade Escort Cards

Photo Credit: Martha Stewart

Martha comes through once again with these delish escort cards!

9. DIY Ribbon on Bamboo Poles

Photo Credit: Wedding Bee

This would be so incredibly perfect for an outdoor, summer wedding!


DIY Table Numbers

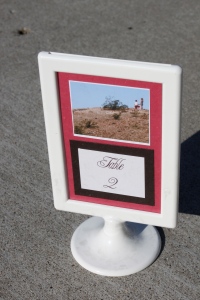
Going along with the centerpiece posts the last couple days, I thought I would also share how I made my own table numbers. On a budget. They were fun. Festive. Easy to make. Easy on the budget. And I was able to include a lot of people in them.

I found these fantastic frames at Ikea. Again, we had 20 tables, so I got 20 of them. I think they were $1. Each. Fantastic. And, the reason I liked them a little more? They have 2 sides on them. So, rather than the regular frame that only faces half the table, I was able to include 2 pictures per table.

What you need to make each table number:

  • (1) 4″x6″ frame
  • (1) 4″x6″ colored paper (pink in picture)
  • (2) 2″x3″ other colored paper (brown in picture)
  • (2) 2″x3″ picture
  • (2) 1.5″x2.5″ Table # printed on paper
  • Paper cutter or scissors
  • Double stick tape

I also chose to use a paper cutter since it turns out a lot neater looking with straighter edges than using a scissor. And you only need 1 sheet of 4″x6″ colored paper (pink in photo) since you see it on both sides.

Cut out the picture of your choice a little smaller than the width of the paper. I chose 2″x3″. Cut the other colored piece of paper (brown in photo) the same exact size.

I used Microsoft Word to type out the table numbers. You can see the size of your lettering on the ruler toolbar on the left to see how big it will be when you cut it out. Once you get the sizing right, you can print all of them at once. Remember, you need 2 of each Table Number since the frame is double sided.

Cut the Table Number a little smaller than the second color sheet of paper (brown in photo). I chose 1.5″ by 2.5″.

Use double stick tape on the back of the table number piece. Center it on the small colored piece of paper (brown).

Visualize an imaginary line that goes down the center of your colored (pink) 4″x6″ piece of paper. Use double stick tape on the back of the small colored paper (brown) with the table number on it and center it on the bottom half of the larger piece (pink) paper.

Use double stick tape on the back of the photo and attach it to the center of the top half of the colored (pink) 4″x6″ piece of paper.

Do the same thing on the back side of the large (pink) piece of paper and insert the entire thing into the frame. And there you have it! An easy, cheap budget-friendly, yet classy looking table number!! You could also choose to spray paint the frame if you’d like. It comes as white and that’s the way I left it.

More DIY Centerpiece Ideas on a Budget

After yesterday’s post, my beautiful friend from college, Rochelle, is helping her cousin with some centerpiece ideas. She requested help in finding more ideas. I thought I would collaborate and find a few others that I think are fantastic out there and share them with you! Again, this is all to inspire you when deciding on what you want for your big day.

PS – I love getting feedback and questions, so if there’s something you’d like to learn more about or ideas that you’re looking for, let me know – I’ll add a post about it!!

Centerpieces are a huge focal point. It’s what everyone sees when they first walk into the reception. It’s what they stare at (or through) before/during/after dinner, and throughout the night. The table that they sit at is their “home base” for the night. It’s where they put their jacket, their purse, their programs, their stuff. The centerpieces are definitely something people remember. They take pictures of them. And sometimes, they even take home.

That being said, here are a few of my favorites that I’ve seen out there!

Photo Credit: Glamour and Grace

DIY Etched Terrarium Centerpiece

This HAS to be one of my absolute FAVORITES!!!!! Glamour and Grace blog gives you the step-by-step layout of what to do. And there are so many ways you can customize it too!

The DIY-ness of it allows you to customize it to your theme and your personal flair. You can:
– use whatever font you want on the glass
– use any type of vase or bowl or jar
– use any size, shape, height centerpiece (just remember you want the word to fit)
-fill it with whatever your heart desires depending, again, on your theme – some ideas can include rocks, sand, flowers, flower petals, a floating candles, branches, leaves, candy, beads, faux crystals, wood chips.. the list goes on…

Photo Credit: Wedding Bee

DIY Manzanita Branch & Crystal Drops Centerpiece

Weddingbee.com is another fantastic resource for all things wedding! You can see other people’s ideas, struggles, and buy/sell your own wedding items through their classified section.

One of the users made these to-die-for DIY Manzanita Branch & Crystal Drop centerpieces that are absolutely GORGEOUS! Talk about making a serious statement! They are beautiful, draw attention, aren’t too big where you can’t see anyone but the person next to you, and will be remembered!

Please note that making the crystal drop pieces can be very time-consuming depending on the size, shape and “readiness” of the crystals. If they already come on a string, great. If you need to create them, it can take a while, so plan ahead! You don’t want to be trying to make these the month of your wedding day.

Photo Credit: A Law Student's Journey

Light bulb DIY Vase Centerpiece

A Law Student’s journey documented this adorable little DIY vase made out of a light bulb. It’s easy, simple, budget-friendly makes a statement, and could perfectly fit your decor and theme.

To make it your own you could:
– use the flower of your choice
– use the light bulb size & color of your choice
– spray paint the metal hanger and/or the light bulb
– fill the light bulb with sand, crystals, beads, or any of the above suggestions


Photo Credit: Pure and Noble

DIY Custom Spray Painted Mason Jars

Pure and Noble’s blog outlines how to make these customized mason (and other) jars that you can use as centerpieces. I think these are so crafty, easy, sometimes FREE, and soooo stinking fun!!

You can use whatever wording, design, and color that you WANT!! They are totally customizable – the more creative, the better.

These would work great for a shabby chic, vintage or country theme.


Photo Credit: Cleverly Inspired

DIY Wine Bottle Centerpieces

These awesome, spray-painted wine bottles are featured on Cleverly Inspired’s blog as a winter Christmas display. Why not customize it for your special day instead??

All you need are:
– some empty wine bottles… that should be a piece of cake to get…
– spray paint of your color – you can even find glitter sprays now too
– a box of epsom salt which you can find at your local Target store

You can put flowers that fit your theme, manzanita branches or a branch you find outside, and whalla… you got yourself a rocking centerpiece!

Photo Credit: Martha Stewart

DIY Candle Centerpiece

Martha Stewart ALWAYS comes through when you need a good idea, some inspiration, or a DIY project! And, she does have my dream job…

I really like the classy, enchanted, romantic feel these DIY candle centerpieces are. They would be so simple to make, and easy on the budget!!

*Disclaimer(S)* – if wanting to use candles at your wedding, double check with the venue first. Some venues have rules  that need to be followed. I would also caution if considering scented candles and the size of your space. You don’t want it to be too much. I would also highly recommend putting them in or on something, especially if you’re renting your linens. You don’t want to ruin them, have wax everywhere, and not get your deposit back. You can buy the glass votives and hurricane vases to put large candles in.

I hope this helps! At least it’s a start. As I mentioned above, I love getting feedback and questions, so if there’s something you’d like to learn more about or ideas that you’re looking for, let me know – I’ll add a post about it!!

xoxo
Karen

Budget DIY Centerpieces

Budget DIY Centerpieces – around $65. Total.

Weddings are expensive. Period.

You think you are on a $10,000 budget. You are WAY off. The church, the wedding venue, DJ, photographer and catering cost $10,000. Alone. It didn’t include everything else that goes into a wedding. You didn’t even think about linens, dishes, the pastor, bridal party gifts, favors, cocktails, and your dress, the rings… The. List. Goes. On….

I get it. I was there. That’s my story above.

So, I thought I’d share what I did for my centerpieces. Maybe it will inspire you to be thrifty on these. Maybe not. Maybe it will bring other ideas to mind. Maybe not. But I hope it does.

We were on a 200-person guest budget. For everything. We ended up with about 160. Better to over-prepare than under, right? I thought so. I still do. It would be embarrassing to not have enough of something.

So, that being said, we had 20 tables of 10, so 20 centerpieces to make, plus we did 3 for the head table, so a total of 23.

I went to the dollar store and bought this cylinder vase:

You can probably find one you like at Ikea or a thrift store, or even a swap meet type thing. Total cost with tax was around $30.

I went to Ikea and bought a package of 24 floating white candles for $5.99 here:

Again, I’m sure you can buy packages of floating candles in several places, and they have plenty of colors, but this was exactly what I was looking for.

We went for a rustic theme. My family is from Minnesota and most of them still live there. Including my amazing parents. I asked my dad to make some wood rounds with our initials in a heart. He did them perfectly and they came out incredible. Cost: FREE

I also bought 3 of the packages of white, unscented votive candles & we put 3 on each table and around the venue for some extra light. These cost about $10 per package of 25. Total: $30

Our wedding colors were fuscia & dark brown. I filled the vases with fuschia bougainvillea. You can put whatever flowers work or fit best with your theme. We filled the vases with water, put the floating candle on top and this is what we ended up with! I couldn’t have been happier! I hope this helps inspire you or someone you love!


5 Creative Ways to Ask Your Bridesmaids

Your bridesmaids are your girls, your best friends, your confidants, the ones you can be vulnerable with, the ones you trust, the ones you love. And the ones that you get to be honored having stand next to you on the biggest day of your life!!

There are so many fun, creative and special ways to ask your besties to be a special part of your day! Here are a couple ideas to get the ball rolling to ask your girls! Remember to ask them in person – asking your girlfriends in person makes it way more personable and will be a moment for you guys to share & always remember!!

1. Photo Puzzle – You can make great photo puzzles on PuzzleMatic to give to your party. You could either do a picture of you and your man, a photo collage of the things you love to do, or make individual puzzles for each of your maids & men! You can include as many photos as you want as well as text. In the text you can think of a creative way to ask!


2. DIY Scrabble Magnet Board – Check out this awesome DIY post on The Twice Remembered Cottage blog making a magnetic scrabble board – what a fun thing to do to ask your crew!!

3. DIY Expandable Photo Card – I saw this adorable idea on this WeddingBee post! It would be very time consuming, but since she had 4 bridesmaids, it worked for her! She chose fun pictures of her and each girl with writing on the front and back. You could include whatever you want – a saying, a poem, incorporate an inside joke – to make these as personal as you want! She also included the silly way they asked their groomsmen!

4. Personalized Hangers – my best friend from High School got me a fun hanger like this for my wedding that said Mrs. Wujek in it – it was so special and I hung my dress on it for the “getting ready” pictures on my wedding day. But, why couldn’t you have a personalized one with all the girls’ names on it or just the word Bridesmaid on it as a fun way to ask them to stand next to you?? You could hang a couple pictures of you guys on it from ribbon or even clip them on with paperclips or clothespins. Check out etsy.com for tons of ideas and price points – the one pictured can be found here.

5. Custom Wooden Box – I saw these on Etsy.com as well and you could probably even do this as a fun little DIY project if you wanted to try to tackle it! You could also include a fun card, and some goodies in there – maybe lip gloss and nail polish the colors of your wedding – or some of your favorite things with your special gal.